Column Mode & Column Editor
Use Alt + Mouse dragging or Alt + Shift + Arrow keys to make a selection in column mode:
In column mode, typing will type the same thing in all the rows of the column. If you copy/cut in column mode, then you copy/cut a rectangle of text, which can be pasted over an identical-sized rectangle elsewhere, or pasted into a separate document or separate application. This is implemented for making working with rectangles of text (instead of whole lines of text) more convenient.
The Column Editor dialog, accessed via Edit > Column Editor, allows you to insert text or numbers in every row of the active Column Mode selection:
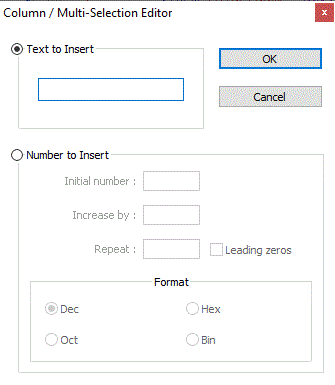
- The
Text to Insertwill use the same text in every row. - The
Number to Insertwill insert increasing numbers.Initial numbersets the starting number.Increase bywill change the step between numbers. With a value of0(or if left empty), it will insert the same number every time.Repeatwill repeat the same number n times. Defaults to 1 if left blank.☐ Leading zeroswill cause all the numbers to have the same number of digits, by adding leading zeros for the smaller valuesFormatchooses between Dec (0-9), Hex (0-9,A-F), Oct (0-7), or Bin (0-1). Note: the numerical boxes above are always in decimal, even if a different format is chosen for display. (Example: to getF-1F, column-select 17 rows and set the initial number to15– it will not allowF.)
Multi-Editing
Multi-Editing mode allows you to make multiple caret selections by using Ctrl+Click for each additional caret. This allows performing the same editing actions (typing, copy/cut/paste/delete, arrowing through the text) in multiple locations, even if they aren’t lined up in a nice column, or even if there are lines between the carets that you don’t want to affect.
Whether or not you can use Multi-Editing mode is determined by the Settings > Preferences > Editing > ☑ Enable Multi-Editing (Ctrl+Mouse click/selection checkbox: with it checkmarked, Ctrl+Click will add caret locations; with it not checkmarked, Multi-Editing is disabled.
Dual View
To create Dual View, drag and drop any tab that you want it to be in another view (or right click on the tab) then choose “Move to Other View” command from the popup context menu. Once you’ve got 2 views, you can move files between 2 views by drag-and-dropping.
Clone Document
Drag and drop any tab that you want to clone (or right click on the tab) then choose “Clone to Other View” command from the popup context menu. The cloned document is the same document as its original one, but with the separated views.
Character Panel
The Character Panel, accessed through the Edit > Character Panel menu entry, allows the user to interact with the first 256 characters in the active Encoding or Character set.
When opened, the Character Panel will be by default a docked window on the right-hand side of the Notepad++ main window, entitled ASCII Codes Insertion Panel. (This is a bit of a misnomer since ASCII is defined as values 0 - 127 and the panel shows values in the range 0 - 255.)
This panel contains a grid-like control that has five columns: Value, Hex, Character, HTML Number and HTML Code. If input focus is moved to a line in the Character Panel and Enter is pressed, the character from the Character column will be inserted at the current position in the document being edited. If the mouse is used there is more flexibility: an item from the grid that is double-clicked will be inserted. For example, when double-clicking " from the HTML Code column on the line of value 34, " (as literal text) will be inserted at the current position in the active document – so this can be used to insert the character number in decimal or hexadecimal, the character itself, or the numeric or named HTML entity into the document being edited.
When Notepad++ is told to interpret a file as ANSI or any of the Character Sets (described in the Encoding-menu docs), the Character Panel shows information about the 256 8-bit character numbers (that is, the Value) for the character set selected. Note that for all character sets, the 0-127 character values always represent the same character (the ASCII character); character values from 128-255 are character-set specific as to which character each value represents. The panel offers an easy way to see value and character equivalence, and insert characters that don’t exist on your keyboard.
When Notepad++ is told to interpret a file as Unicode (the entries starting with UTF-8 or UTF-16 in the Encoding menu), the Character Panel will show the same characters for values 128-255 as the default codepage character set on the user’s system (viewable as Current ANSI codepage in the ? > Debug Info menu entry). In this case, for values 128-255, the Value column is meaningless – only the Character shown is important. If this panel is used to insert the character into the active document, the correct Unicode character bytes will be used instead of the value as in the simpler ANSI case. For values from 0-127, the character/value pair is meaningful, because for this range the ANSI set of characters – the true ASCII set – line up with the same characters and values in the Unicode set.
Change History
Notepad++ has a column in the margin section which indicates which lines have been changed since the file was last loaded, controlled by a checkbox in Settings > Preferences > Margin / Border / Edge with the background color set by the Settings > Style Configurator > Global Styles > Change History margin (new to v8.4.6)

- When the file is first loaded (or a new file is created), no lines have a color in that margin column.
- If a line is changed (added or edited) since the most recent load or save, it will be orange. (This is
Modified but unsavedin the image.) - After the changes to the file are saved, any lines that have been changed since the file was loaded will be green. (This is
Modified but savedin the image.)- Note: If you tell Notepad++ to reload the file from disk, all lines will be green.
- Multiple saves will leave those lines green, even if they weren’t changed since the previous save.
- The only way to get back to having no color in the margin is to close the file and reload it (easy enough to do with File > Close followed by File > Recent Files > Restore Recent Closed Files, or with default shortcuts, use
Ctrl+WthenCtrl+Shift+T).
- If the file is saved, if you use Undo to go back to the previous modified state, it will be a pale green (some call it “olive” or “yellow-green”). (This is
Revert to modifiedin the image.) - If the file is saved, if you use Undo to go back to the original state of that line (the text it had when the file was originally loaded), it will be a pale blue (some call it “cyan”). (This is
Revert to originalin the image.)
Edit Menu
Aside from the normal undo/redo/copy/paste entries, there are a number of sub-menus to the Edit menu, which group together various categories of editing-related commands, and a few other editing commands in the main Edit menu.
Insert >⇒ submenu with actions that insert the date and time (new to v8.1.4)Date Time (short)⇒ like12:46 PM 8/21/2021(new to v8.1.4)Date Time (long)⇒ like12:46 PM Saturday, August 21, 2021) (new to v8.1.4)Date Time (custom)⇒ can insert a date with a customized format, as defined in the Settings > Preferences > Multi-Instance & Date dialog
Copy to Clipboard >⇒ submenu with actions that copy current filename, path, or directory name to the clipboardIndent >⇒ submenu with actions that increase or decrease the current line’s indentation, based on the syntax language’s tab/indent settingsConvert Case to >⇒ submenu with actions that change the case of the selected text (all UPPERCASE, all lowercase, and various mixed-case settings)Line Operations >⇒ submenu with actions that typically work on lines (also known as “rows”) of your document- There is a method for duplicating data:
Duplicate Current Line: duplicates the current line if no selection is active, or duplicates the selected text if a selection is active
- There are two versions of the Remove Duplicates functionality:
Remove Duplicate Lines: leaves only the first instance of any full lines that have more than one copy anywhere in the active file; acts upon the line set spanned by the current selection, or the entire file if no active selectionRemove Consecutive Duplicate Lines: will only remove duplicates that are on the lines immediately following the first instance (still keeping the first instance); acts upon the line set spanned by the current selection, or the entire file if no active selection- NOTE: Duplicates removal is performed with the assumption that all line-endings in the file are uniform and match the current selection for the file being edited – the quickest way to check that selection is to glance at the status bar, where the current line-ending type is shown either as
Windows (CR LF),Unix (LF)orMacintosh (CR). It might be desirable to check the line-ending types in your file before executing a sorting operation, and use theEdit > EOL Conversion >choices or right-click on the Status Bar’s EOL indicator to fix the line endings if necessary.
- There are methods for splitting lines and joining lines together:
Split Lines: will insert a line-ending into a long line(s): if there is one or more Vertical Edge value specified (requires v7.9.3 or later), it will split at the right-most Vertical Edge; otherwise, it will split at the current size of the editor window. It operates on the lines spanned by the current stream selection or the single line of the caret if no stream selection is currently active.Join Lines: will combine the lines touched by the active stream selection by replacing line-endings with a single space character. It requires an active stream selection that spans two or more lines.
- There are commands for removing lines
Remove empty lines: will remove all lines containing no characters from the entire documentRemove empty lines (Containing Blank characters): will remove all lines containing no characters from the entire document; if a line contains only space or tab characters that line will be removed as well
- There are commands for changing the order of existing lines:
Move Up Current Line: will swap the current line with the line above it, effectively moving the line of the caret up one row in the document; if a selection spanning lines is active upon invocation, it will move those lines touched by the selection up as a groupMove Down Current Line: will swap the current line with the line below it, effectively moving the line of the caret down one row in the document; if a selection spanning lines is active upon invocation, it will move those lines touched by the selection down as a groupReverse Line Order: will take the selected lines (or all of the lines of the current document if no active selection) and will order them reversely (i.e. flipped) from their existing order (added in v8.0.0)Randomize Line Order: will take the selected lines (or all of the lines of the current document if no active selection) and place them in an unpredictable order (added in v7.9 as “Sort Lines Randomly”; renamed in v8.0.0)
- There are a variety of sorting algorithms:
Ascendingmeans smallest to largest (A-Z)Descendingmeans largest to smallest (Z-A)Lexicographically(orLex.) means based on character codepoint, comparing one character at a time:- All uppercase letters will sort before any lowercase letter, so uppercase
Zwill sort before lowercasea - The sequence
10will sort before2, because it sorts character-by-character of each collection of characters, and the character1comes before the character2
- All uppercase letters will sort before any lowercase letter, so uppercase
Ignoring casemeans that lowercaseawill sort the same as uppercaseA, and both will come before eitherZorzAs Integersmeans that10will sort as being bigger than2As Decimals (Comma)means it will recognize10,234and9,876as decimal numbers and sort them numericallyAs Decimals (Dot)means it will recognize10.234and9.876as decimal numbers and sort them numerically- NOTE: Sorting is performed with the assumption that all line-endings in the file are uniform and match the current selection for the file being edited – the quickest way to check that selection is to glance at the status bar, where the current line-ending type is shown either as
Windows (CR LF),Unix (LF)orMacintosh (CR). It might be desirable to check the line-ending types in your file before executing a sorting operation, and use theEdit > EOL Conversion >choices or right-click on the Status Bar’s EOL indicator to fix the line endings if necessary. - NOTE: If a Column Mode selection is active, the sort will re-order all the lines included in the selection, but the sort key (the text that decides the sort order) will be limited to what is inside the column selection. This column-selection-based sort will be a “stable sort”: if the keys are identical on two lines, then the order of those two lines will not change, even if text outside of the selected key columns is different.
- There is a method for duplicating data:
Comment/Uncomment >⇒ submenu with actions that add or remove comment syntax, based on the file’s Language selection. This makes use of thecommentLine,commentStart, andcommentEndattributes of the active Language as defined in langs.xml to define the characters to use for making or clearing line comments (commentLine) and block comments (commentStartandcommentEnd).Auto-Completion >⇒ submenu with actions that manually trigger auto-completion of function name, word, function parameter, and pathname. While the automatic completion is affected by Preferences > Auto-Completion settings for setting minimum number of characters, and enabling which of the completions happen automatically, when you manually trigger one of the auto-completion actions through this menu or keyboard shortcut equivalents, completion will happen regardless of those settings (so you can manually trigger when there’s fewer characters than the auto-trigger threshold, or you can manually trigger function completion when only word completion is active).EOL Conversion >⇒ submenu with actions that convert line endings between Windows (CRLF), Unix (LF), and old Macintosh (CR) values; these operations affect all of the lines of the current file- If your file has mixed line endings (some
CRLFand someLF, for example), you can use this menu to fix it: if the desired line-ending is not greyed out, you can just select it, and any mixed line-endings will be converted to the chosen line ending; if the desired line-ending is greyed out, select one of the other line-endings, then switch back to the desired line-ending selection, and any mixed line-endings will be converted to the final line-ending choice.
- If your file has mixed line endings (some
Blank Operations >⇒ submenu with actions that trim or convert spaces and tab characters on ALL lines of the current fileTrim Trailing Space: removes any space or tab characters occurring at the end of a line, after any non-whitespace charactersTrim Leading Space: removes any space or tab characters occurring at the beginning of a line, before any non-whitespace charactersTrim Leading and Trailing Spaces: combines the functionalities ofTrim Trailing SpaceandTrim Leading Spaceinto one commandEOL to Space: replaces line-ending characters with a single space character (similar toJoin Linesfunctionality, but acts upon the entire file rather than the active selection); note: “EOL” means “End Of Line” – in other words, line-ending charactersRemove Unnecessary Blank and EOL: performs a combinedTrim Leading and Trailing SpacesandEOL to SpaceoperationTAB to Space: replaces any tab characters with their equivalent number of spacesSpace to TAB (All): consolidates space characters into an equivalent number of tab characters, wherever the spaces occurSpace to TAB (Leading): consolidates space characters into an equivalent number of tab characters, but only where they occur before the first non-whitespace character on a lineNOTE about TAB-related commands: the “equivalent number” of spaces (or tab characters) is based on the Settings > Preferences > Language > Tab Settings: Tab Size for the active language of the current file, and will be enough spaces to take you to the next “tab stop”.
If the current langauge has a tab setting of 4 spaces per tab, then the tab stops are at 1, 5, 9, 13, and so on.
If you have a tab at column 1, 2, 3, or 4, it will be wide enough so that the next character will be at column 5; and if you convert tabs to spaces, it will replace it with 4, 3, 2, or 1 space (respectively), so that the next character will still be at column 5.
Similarly, tabs at columns 5, 6, 7, or 8 will be displayed as wide as (or converted to spaces as) 4, 3, 2, or 1 spaces (respecitvely), so that the next character will be at column 9.
These examples are shown in the screenshot below, where View > Show Symbol > Whitespace and Tab shows the tabs as an orange arrow (
→) and the spaces as an orange middot (·); the left shows it with tab characters; the right shows it with those tabs converted to spaces: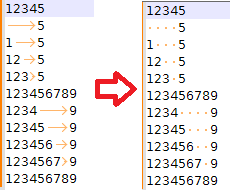
If you want a specific number of space characters to replace each tab character, instead of the above-described fill-to-tabstop behavior, you should use a replacement operation in Extended or Regular Expression search mode to replace
\twith the number of space characters you desire.
Paste Special >⇒ submenu with actions that pastes HTML or RTF, and special versions of copy/cut/paste which handle NULL and other binary characters- Note: The HTML and RTF actions paste the HTML and RTF source code from the HTML or RTF entries in the Windows Clipboard; it does not apply HTML or RTF formatting to what appears to be plain text in the Notepad++ editor window.
On Selection >⇒ submenu with actions that use the currently-selected text as a filename or folder to open, or as a term for an internet search. (Custom commands using the current selection can be added to the Run menu, using the<UserDefinedCommands>section ofshortcuts.xml.)Column Mode...⇒ dialog explaining Column ModeColumn Editor⇒ runs the Column Editor dialog, described aboveCharacter Panel⇒ toggles the Character Panel, described aboveClipboard History⇒ allows you to re-access recent copy/paste values (double-click a row to paste that value)Set Read-Only⇒ toggles Notepad++’s read-only flag on the active file buffer.- If you click this menu entry once, it will add a checkmark
✔to the menu entry, to show that it’s currently read-only for Notepad++. If you click this menu entry when there is already a checkmark✔, the checkmark will be removed and Notepad++ will no longer consider this file read-only. - The state of this Notepad++ read-only flag is saved in the session file, so it will be remembered the next time the session is used.
- Note: this toggle does not affect the Windows Operating System’s read-only attribute on the file; if Windows has marked this file as read-only, this menu entry will be greyed out and you cannot toggle it by clicking on it. See the
Clear Read-only Flag(below) for more on the OS flag.
- If you click this menu entry once, it will add a checkmark
Clear Read-Only Flag⇒ clears the Windows Operating System (OS) read-only attribute on a file.- Once the OS read-only flag has been cleared, this menu option will be greyed out and clicking on it will do nothing.
- You cannot set the OS read-only flag using this menu in Notepad++; it has to be done through the OS (though Notepad++ scripting plugins are able to ask the OS to set the OS read-only flag on the file, like in this example in the Community Forum).
- If you use the OS to set the flag on a file that is open in Notepad++, and Settings > Preferences > MISC > File Status Auto-Detection has been checked, then Notepad++ will notice that it is now a read-only file, and not allow you to edit the file.
- If you use the OS to set the flag on a file that is open in Notepad++, but Settings > Preferences > MISC > File Status Auto-Detection has been unchecked, then Notepad++ will not notice that it was changed to read-only by the OS, and will blindly allow you to continue making changes; however, when you try to save and it sees that the file is read-only according to the OS, Notepad++ will notify you that you cannot save, and ask if you’d like to launch Notepad++ in Administrator mode to try to make the changes (if you do, the changes you made may be lost).
- The current file’s tab will have the “locked” icon (either the greyed-out disk icon by default, or the padlock icon if Settings > Preferences > General > ☑ Alternate icons has been checked on) whether the Windows OS read-only attribute is set, or the Notepad++ read-only flag has been set, or both. The “locked” icon will change to a normal icon once neither the Windows OS read-only attribute nor the Notepad++ read-only flag are set (or equivalently, once both flags are cleared).
Other Editing Commands and Shortcuts
There are also around a hundred editor commands that are accessible from keyboard shortcuts (though not all have a keyboard shortcut assigned by default). Many of those commands are not in the Edit menu (or any other Notepad++ menu). These commands are listed in the Shortcut Mapper’s Scintilla commands tab, and you can use the Shortcut Mapper to edit the assignments (add shortcuts or remove shortcuts) for these commands, whether they currently have a shortcut or not.
They have somewhat cryptic names, but if you look at the portion of the name to the right of the SCI_ prefix, it does give you a hint. For example, SCI_CUT shows the shortcuts for the traditional Cut command, and SCI_LINECUT will cut the whole current line, rather than just the selection. The ones that have LINE in the name work on complete lines; if it has CHAR in the name, it works on individual characters; if it has WORD in the name, it works on whole words; and if it has WORDPART in the name, it works on partial words (also called “subwords”, like MyCoolFunction has the three subwords My, Cool, and Function); if it has PARA in the name, it works on paragraphs (a paragraph ends with two consecutive newlines – so a blank line between paragraphs); HOME, END, PAGEUP, and PAGEDOWN correspond to the motions often associated with those keys on your keyboard. If it has CUT, COPY, PASTE, and SELECT in the name, it indicates a variant of the normal editor actions of cutting, copying, pasting, and selecting text; if it has DELETE or DEL in the name, it will delete what is indicated in the rest of the name; if it has EXTEND in the name, it “extends” the selection (adds to the selection; these are usually the Shift+-modified commands for growing the selection). That should be enough to help you understand the basics of what each of those commands do.
The Scintilla project, which Notepad++ uses to implement these traditional editor commands, has documentation for those commands: you can look at the SCI_xxxx in the shortcut mapper, then search for that text on their ScintillaDoc page to find out more about that command.
But with so many commands, and the fact that no documentation set is likely to ever explain everything in the way that makes the most sense to you (what makes sense to one user might be really confusing to another), it might be fruitful to play with some of those commands to see for yourself what they do. (Notepad++ doesn’t let you edit text while the Shortcut Mapper is open: one possible method of doing this experimentation is to have two instances of Notepad++ running, and have the Shortcut Mapper open to the Scintilla commands in one instance, and play with using them in the editor in the other Notepad++ instance.)
Printing
The File > Print action will pull up a Windows-standard print dialog, from which you can choose your printer and send your text to the selected printer. Normally, it will print the whole document, but you can use the print dialog to choose only certain pages; if you have an active selection in the editor, only the selected text will be printed.
The printing of the text is affected by the Settings > Preferences > Print settings, where you can decide things like whether or not to include line numbers in the printout, margin widths, extra text to print in the header and/or footer of every page, and the Colour Options will determine how your Style Configurator theme’s colors will be propagated to the printed output. It is up to you as the user to decide which printing settings are best to meet your needs, and will look best on your printed medium of choice. Please note that with any themes with colored backgrounds, some of those colors will be printed to the background of your printed page unless you choose one of the Colour Options that does not print the background color; but with darker themes, which use light text on dark backgrounds, if you don’t have it print the background color, then it will be very light text on your white paper. If you have a printer which allows you to print to PDF, that is a good way to see what the printout will really look like without using the paper and ink (and if you don’t have a PDF printer available, your favorite search engine will show you plenty of commerical and freeware PDF printers by searching for something like “windows pdf printer” or “print to pdf”).