
Tags are a powerful way to organize notes in Bear. They can be created on-the-fly, placed anywhere in a note, and you can add neat icons to them in the Sidebar. But that’s just the start.
Tags can do much more in Bear. Let’s explore some core features and uses in this post, then some more advanced tips and ideas in a future part two.
Add tags anywhere in the body of a note
To create a tag in a note, simply combine a word with a pound sign, like #ideas or #groceries or #gifts.
All tags you create are collected in the Sidebar.
Use multi-word tags
Sometimes, a single word won’t do. Create multi-word tags by wrapping two or more words in pound signs, like:
- #home improvement#
- #blog posts#
- #world domination#
Drop notes onto tags
Another way to quickly add a tag to one or more notes is to drag the note(s) onto the tag in the Sidebar. Learn how to select and drag multiple notes on iPad and iPhone (as well as the Drop Bar!).
Remove a tag from multiple notes
Select a tag in the Sidebar, then select multiple notes. On a Mac, right-click a selected note, then use the Remove #tag option.
Learn how to use drag and drop on iOS, then use our Drop Bar to remove a tag from multiple notes.
Create new notes within a tag
Select a tag in the Sidebar, create a new note, and the tag will already be in there. You’re welcome.
Tag inception (nested tags)
You can nest tags within other tags. This is a great way to add granularity to organizing notes within the same parent topic, such as a journal with dated entries, meeting notes, project ideas, and weekly task roundups.
To use nested tags, separate two words in a tag with a forward slash, like this:
- #work/ideas
- #work/meeting notes#
- #journal/2019/12/01
- #writing/posts
- #writing/social media#
- #personal/wishlist
Rename tags
Sometimes a tag needs to evolve, like the proverbial caterpillar into a butterfly. To rename a tag for all notes, right-click (Mac) or long-tap (iOS) a tag in the Sidebar, then select Rename tag. Multi-word tags are fair game here.
Customize TagCons
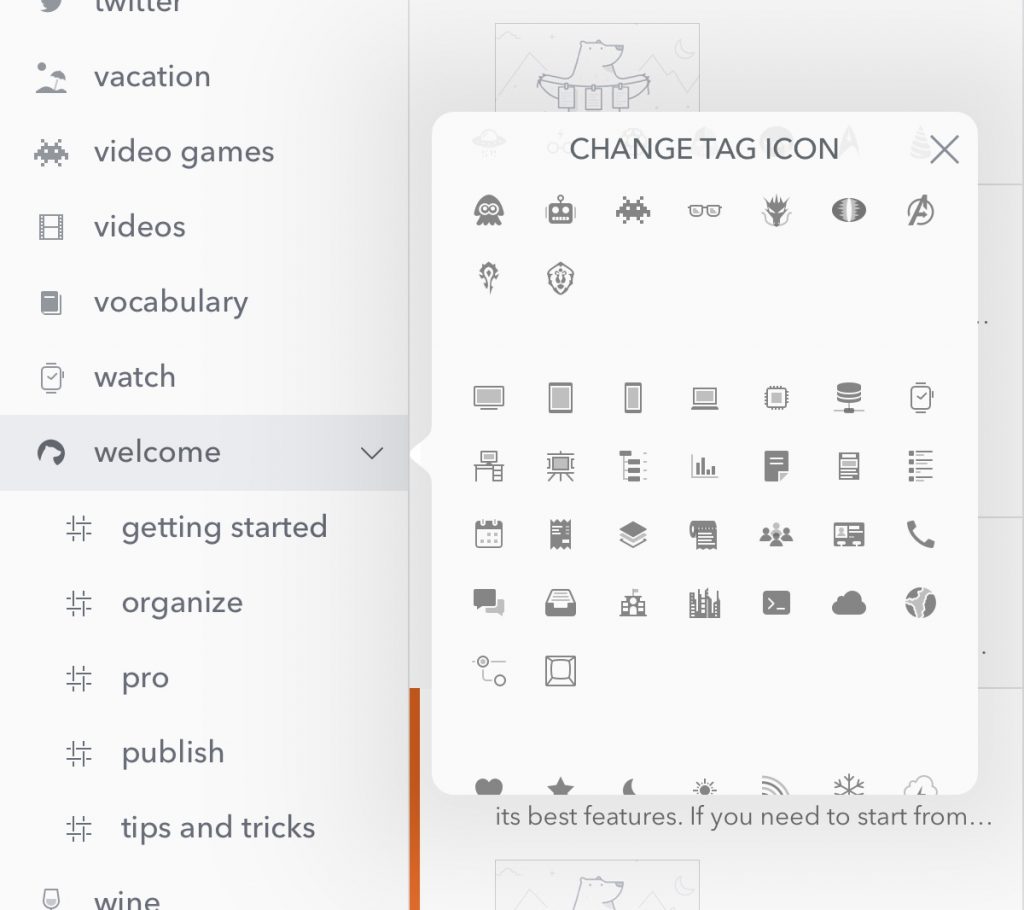
Bear contains a variety of TagCons to help your tags stand out in the Sidebar. It even automatically assigns them to popular tags like ideas, books, jokes, journal, and more.
To add or customize a TagCon, right-click (Mac) or long-tap (iOS) a tag in the Sidebar, then change Tag Icon.
Quick tag navigation
When you are not in Edit Mode, you can click a tag in a note to view all other notes with that tag. It’s basically a shortcut to selecting that tag in the Sidebar.
How to remove tags when you print, export notes
For folks who want to print or export notes for sharing or publishing elsewhere, there’s a way to leave your tags out of it. Simply go to Settings > General and toggle off Keep tags during export. This way, your tags stay between you and your copies of Bear, literally—we can’t see any of your activity, notes, or even tags. We’re big on privacy.
Something to note here: While we like that tags can be added anywhere in a note (even in the middle of sentences!), working that way in Bear can make for some… awkward exports if you exclude tags. So be aware and tag accordingly.
Happy tagging
We hope you liked part one of this series on tagging in Bear. With part two, we’ll explore some more advanced features, tips, and ideas for getting the most out of tags and organizing notes with Bear. We’d love to hear your favorite tips and ideas on Reddit, Twitter, Facebook, or directly at bear@shinyfrog.net.